
AI Photo Prompt Camera Angles and Framing Explained
Learn how close-up, waist-up, full-body, low-angle, eye-level and wide framing change AI photo results, with practical before-and-after prompt examples.
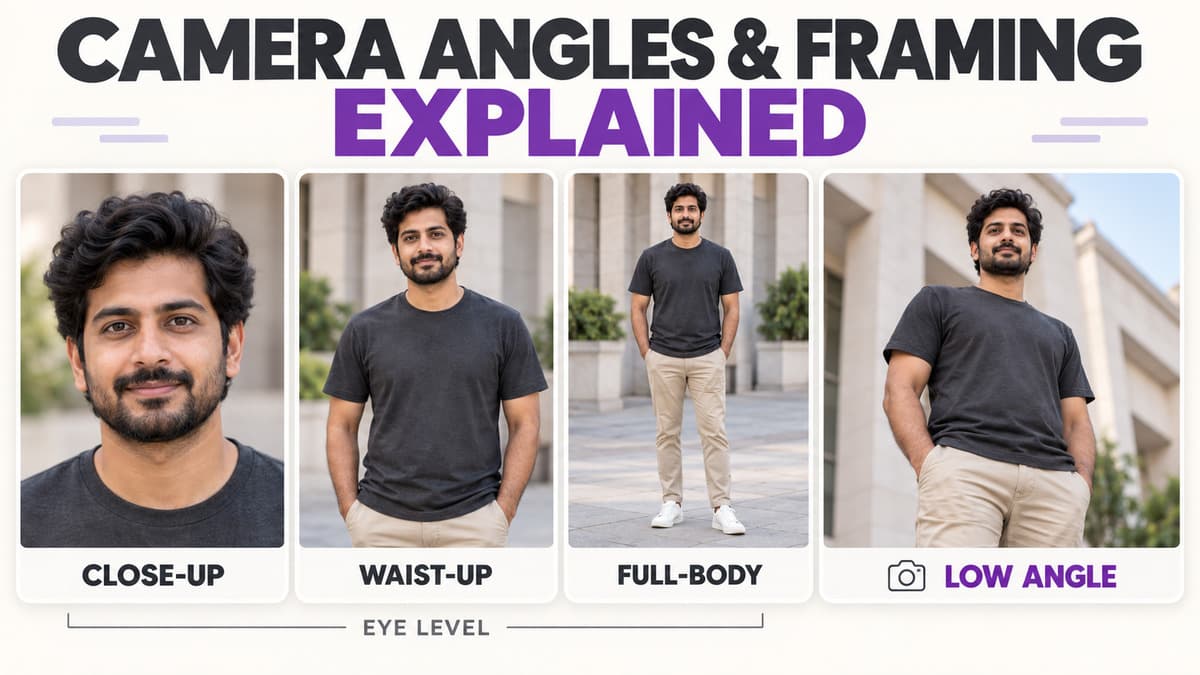
Camera angle and framing are two of the most important parts of an AI photo prompt, but they are also among the most confusing. Many users know what kind of image they want, but they do not know whether to write close-up, waist-up, three-quarter, full-body, low-angle, eye-level, side profile or wide shot. Because of that, the final image may feel too zoomed in, too distant, awkwardly cropped or visually different from what the user expected.
The easiest way to understand the difference is this: framing describes how much of the subject is visible, while camera angle describes where the camera is positioned in relation to the subject. A prompt can use both at the same time, such as a waist-up portrait at eye level or a full-body portrait from a slightly low camera angle.
Prompt King can help you discover ready-to-copy prompt ideas, but understanding framing and camera angle makes it much easier to customize those prompts for the result you actually want.
Framing and camera angle are not the same thing
A close-up is framing, while a low-angle describes camera position. You can combine them in one prompt. For example, a close-up portrait from a slightly low angle and a full-body portrait from a slightly low angle use the same camera position but show very different amounts of the subject. Keeping these ideas separate helps prevent confusing instructions.
What is framing in an AI photo prompt?
Framing tells the AI tool how much of the person or scene should appear inside the image. Common choices include close-up, head-and-shoulders, chest-up, waist-up, three-quarter, full-body and wide environmental shots. The best choice depends on whether the image is mainly about the face, expression, outfit, pose, vehicle, environment, background or story.
Close-up framing
A close-up focuses strongly on the face. It is useful when you want attention on the eyes, expression, makeup, skin detail, hairstyle, nearby jewelry or emotion. An example is: “Close-up portrait of a young woman wearing subtle traditional jewelry, soft natural window light, calm expression, realistic skin texture and a softly blurred background.” Close-up framing gives very little space to clothing or environment.
When close-up works best
Use close-up framing when the face is the main subject. It works well for profile photos, beauty portraits, emotional portraits, makeup-focused images and cinematic face shots. It is less suitable when the complete outfit, vehicle or full body pose is important.
Head-and-shoulders framing
Head-and-shoulders framing shows the face plus the upper shoulders. It gives a little more context than a close-up while keeping facial detail strong. For example: “Head-and-shoulders portrait of a young man in a dark jacket, looking slightly away from the camera, soft evening light and a simple urban background.” This is a practical choice for professional-looking portraits, profile images and social-media portraits.
Waist-up framing
Waist-up framing is one of the most flexible choices because it balances facial detail, clothing, pose and background. For example: “Waist-up portrait of a young woman in a pastel saree, standing in a quiet courtyard during late afternoon, natural expression and soft side lighting.” It works well when you want the subject to feel natural without showing the entire body.
Three-quarter framing
Three-quarter framing usually shows the subject from around the knees or thighs upward. It is useful for fashion, lifestyle and cinematic scenes because it shows more body language than waist-up framing while still keeping the person prominent. For example: “Three-quarter portrait of a young man wearing a black shirt and dark trousers, standing beside a concrete wall at dusk, relaxed posture and soft directional light.”
Full-body framing
Full-body framing shows the subject from head to feet. Use it when the whole pose, complete outfit, footwear, bike, car or body language matters. For example: “Full-body portrait of a young man standing beside a motorcycle on an open rural road, wearing a dark casual jacket and sneakers, relaxed pose, soft evening light and realistic photography.” A full-body image usually provides less facial detail than a close-up or waist-up portrait.
Wide environmental framing
A wide environmental shot gives the background a much larger role and the subject may appear smaller inside the frame. It works well for travel scenes, landscapes, village settings, beaches, mountains, roads and architecture. For example: “Wide environmental portrait of a young woman standing in an open field at sunset, surrounded by tall grass, warm evening light, natural pose and distant hills in the background.”
Before and after example: vague framing
Before: “Cinematic portrait of a man with a car.” This does not explain how much of the subject should be visible, so the tool may create a close-up, half-body portrait, full-body scene or mostly the car. After: “Full-body portrait of a young man standing beside a black SUV, one hand resting naturally on the vehicle, soft evening light, quiet roadside background and realistic editorial photography.” The second version makes the intended framing much clearer.
Avoid contradictory framing
One common mistake is writing “close-up full-body portrait.” These instructions conflict because a close-up focuses tightly on the face while a full-body portrait shows the entire person. Similarly, “extreme close-up showing the full outfit and shoes” is contradictory. If the outfit and footwear matter, use a wider framing such as three-quarter or full-body.
What is camera angle?
Camera angle describes the camera’s position compared with the subject. Common choices include eye-level, low-angle, high-angle, side profile, three-quarter face view, over-the-shoulder and top-down. Camera angle can change the mood even when the framing stays the same.
Eye-level angle
Eye-level is the most natural camera angle because the camera is positioned roughly at the subject’s eye height. It usually feels balanced, realistic and neutral. Example: “Waist-up portrait at eye level, young man wearing a simple white shirt, calm expression, soft outdoor daylight and natural background blur.” It is a safe choice for most portraits.
Low-angle shot
A low-angle shot places the camera below the subject and points slightly upward. This can make the subject appear stronger, taller or more dramatic. Example: “Full-body portrait of a young man beside a black motorcycle, photographed from a slightly low angle, confident posture, open road in the background and soft evening light.” A slightly low angle is usually easier to control than an extreme low angle.
Before and after example: low-angle prompt
Before: “Powerful man cinematic photo.” The word powerful is vague. After: “Full-body portrait of a young man in a dark jacket, photographed from a slightly low camera angle, standing confidently on an open road, relaxed shoulders, soft evening side light and muted background.” The improved version explains how the camera position contributes to the stronger visual presence.
High-angle shot
A high-angle shot places the camera above the subject and points downward. It can make the composition feel softer, observational or more casual. For example: “Waist-up portrait of a young woman photographed from a slightly high angle, looking gently toward the camera, soft natural daylight and a clean garden background.” Strong high angles can make the subject appear smaller in the scene, so use them intentionally.
Side-profile angle
A side-profile shot shows the subject mainly from one side. It is useful for cinematic portraits, fashion, silhouettes and thoughtful moods. Example: “Close-up side-profile portrait of a young man wearing sunglasses, head slightly raised, soft rim light and dark background.” Side profiles show less of the face than front-facing portraits, which matters when face consistency is important.
Three-quarter face angle
A three-quarter view means the face is turned slightly away from the camera while both sides remain partly visible. This is popular in portrait photography because it feels natural and adds depth without hiding too much of the face. Example: “Waist-up portrait of a young woman in a traditional outfit, face turned slightly to the right in a three-quarter view, natural expression, soft window light and muted background.”
Over-the-shoulder angle
Over-the-shoulder framing shows the subject turned away while looking back toward the camera. It works well for fashion, lifestyle, dreamy scenes and cinematic storytelling. Example: “Waist-up over-the-shoulder portrait of a young woman walking through a garden, looking back naturally, soft evening light and gentle background blur.” Keep the pose simple so the body instructions do not become confusing.
Top-down angle
A top-down image is photographed from directly or strongly above the subject. It is more stylized than a normal portrait and works best when the environment or arrangement around the subject is part of the concept. Example: “Top-down portrait of a woman sitting on a patterned floor, traditional outfit arranged naturally around her, soft diffused daylight and balanced composition.”
Framing changes how much facial detail you get
A close-up gives more visible facial detail while a wide shot gives less. If the subject occupies only a small part of the image, the face may appear less detailed or less consistent. For identity-focused images, start with head-and-shoulders, waist-up or three-quarter framing, then move to wider compositions after the face looks stable enough.
Framing also changes outfit visibility
If you want to show a saree, suit, kurta, gown, shoes or a complete traditional outfit, avoid using a tight close-up. Use three-quarter or full-body framing. If only jewelry, makeup or facial expression matters, close-up or head-and-shoulders framing is more appropriate.
Vehicle photos need wider framing
A common problem with bike and car prompts is that the vehicle gets cut off. A vague prompt such as “Portrait of a man with a motorcycle” may focus mostly on the person. A clearer version is: “Full-body portrait of a young man standing beside a black motorcycle, both the subject and motorcycle fully visible, open roadside background, soft evening daylight and realistic photography.” Wider framing gives the tool more space for both subjects.
Before and after example: bike portrait
Before: “Stylish boy with bike cinematic photo.” After: “Full-body portrait of a young man standing next to a black motorcycle, body turned slightly toward the camera, one hand resting on the handlebar, both subject and motorcycle fully visible, slightly low camera angle, quiet rural road, soft evening light and realistic cinematic photography.” The second prompt defines both framing and camera position much more clearly.
Portrait framing for social media
For vertical social content, it can help to keep the subject centered with enough empty space around the head and body. A useful direction is: “Full-body vertical portrait, subject centered, enough space above the head and below the feet, clean background and balanced composition.” This can reduce awkward cropping. Exact aspect-ratio controls depend on the AI tool being used.
Landscape composition needs more side space
For banners or wide images, the subject may need to be positioned toward one side. Example: “Waist-up portrait of a young man positioned on the right side of a wide landscape frame, open negative space on the left, soft urban background and evening light.” This is useful for website banners, thumbnails, promotional visuals and designs that need room for text.
Centered composition
A centered composition places the subject near the middle of the frame. It works well for profile images, symmetrical portraits, simple fashion shots and clean promotional compositions. Example: “Centered waist-up portrait of a young woman in a traditional outfit, looking directly at the camera, clean symmetrical background and soft diffused lighting.”
Rule-of-thirds style composition
You can also place the subject slightly off-center. For example: “Three-quarter portrait of a man positioned on the left third of the frame, looking toward the open space on the right, soft evening background and natural lighting.” This can make the image feel more editorial and gives the direction of gaze more visual space.
Add negative space when text is needed
If you plan to add text later, ask for clean empty space. For example: “Waist-up portrait of a woman on the right side of the frame, clean negative space on the left for text, soft background and natural lighting.” This is especially useful for blog thumbnails, social posts, banners and ad creatives.
Do not ask for every angle at once
A weak prompt may request front view, side profile, low angle, high angle and over-the-shoulder all at once. Those usually describe several separate images. For one image, choose one main angle. If you want variations, create them separately, such as one eye-level version, one slightly low-angle version and one side-profile version, then compare the results.
Camera angle should support the mood
Do not add low-angle just because it sounds cinematic. Use eye-level for a natural feel, low-angle for stronger presence, high-angle for a softer or observational feel, side-profile for a thoughtful or cinematic mood, over-the-shoulder for storytelling and top-down for a stylized composition. The angle should support the visual idea.
Framing should support the subject
Ask what matters most. If the face is the priority, use close-up. If expression and clothing both matter, use waist-up. If outfit and pose matter, use three-quarter. If the full pose, footwear, bike or car matters, use full-body. If the person and environment both matter, use a wide shot. This simple choice can improve prompt clarity quickly.
Basic prompt vs improved framing prompt
Before: “A woman in a beautiful saree, cinematic photo.” After: “Three-quarter portrait of a young woman wearing a pastel saree with subtle jewelry, standing in a quiet heritage courtyard, body turned slightly away from the camera, face in a natural three-quarter angle, soft late-afternoon side light, warm stone background and realistic photography.” The improved version defines both framing and face angle.
Another before and after example
Before: “Man with black car, premium photo.” After: “Full-body portrait of a young man standing beside a black SUV, photographed from a slightly low camera angle, body turned slightly toward the vehicle, relaxed expression, both subject and vehicle clearly visible, quiet road at dusk and soft directional lighting.” The result is easier to control because both framing and camera position are defined.
Keep camera terminology practical
You do not need advanced photography terminology to write a useful prompt. Simple instructions such as waist-up, eye-level, slightly low angle, full-body, side profile and wide shot are often enough. Use camera terms because they describe the visual result, not because they sound technical.
Avoid over-specifying lenses
Some prompts include terms such as 35mm, 50mm, 85mm, telephoto or wide-angle. Some tools may interpret these words, but lens terminology is not a replacement for clear framing. Instead of relying only on “85mm portrait,” describe a waist-up portrait with natural perspective and soft background separation. If your chosen tool responds well to lens terms, you can add them as secondary details.
Wide-angle distortion can change proportions
Very wide-angle perspectives can make objects near the camera appear larger, which may affect the face, hands, legs, vehicles and background depth. If you want a natural portrait, avoid extreme wide-angle directions unless the distortion is intentional.
Extreme low angles can distort the body
A dramatic low angle can make the legs appear longer or the upper body look smaller depending on the camera position. If the result looks unnatural, reduce the angle. Instead of asking for an extreme low-angle shot, try a slightly low camera angle. Small changes are often easier to control.
Keep face consistency in mind
Camera angle can affect how recognizable a person looks. A front-facing reference changed immediately into an extreme side profile may create more identity drift. If keeping the same face matters, move gradually from front-facing to a slight turn, then to a three-quarter view and finally a stronger profile.
Use framing and angle together
A strong prompt often combines both. Useful examples include close-up side-profile portrait, waist-up portrait at eye level, three-quarter portrait from a slightly low angle, full-body portrait at eye level and wide environmental portrait from a slightly elevated viewpoint. These combinations are clearer than stacking random camera keywords.
Change one camera variable at a time
If a composition is not working, keep the same subject, outfit, background and lighting, then test different framing such as close-up, waist-up and full-body. After choosing the framing you prefer, test the camera angle. Changing one variable at a time makes comparisons easier and shows which instruction actually affected the result.
A simple framing workflow
Start by asking what you want the viewer to notice first. If the answer is the face, choose close-up or head-and-shoulders. If the answer is the outfit, choose three-quarter or full-body. If the answer is the person plus location, choose a wider environmental composition. Then choose the camera angle based on the mood. This gives you a simple two-step system: choose framing, then choose camera angle.
Camera angle and framing cheat sheet
Close-up: face, eyes, emotion and makeup. Head-and-shoulders: profile and professional portraits. Waist-up: face, outfit and natural pose. Three-quarter: fashion, body language and lifestyle. Full-body: complete outfit, shoes, bikes, cars and full pose. Wide shot: environment and storytelling. Eye-level feels natural and balanced. Low-angle feels stronger and more dramatic. High-angle feels softer or observational. Side profile feels cinematic or thoughtful. Three-quarter face angle feels natural and dimensional. Over-the-shoulder feels like storytelling.
Quick prompt formula
A simple structure is subject + framing + camera angle + pose + outfit + location + lighting + mood. For example: “Full-body portrait of a young man standing beside a black motorcycle, photographed from a slightly low camera angle, wearing a dark casual jacket, relaxed confident posture, quiet rural road in the background and soft evening light.” This gives the tool clear composition instructions without overcomplicating the prompt.
Final thoughts
Camera angle and framing become much easier once you separate them. First decide how much of the subject should be visible; that is your framing. Then decide where the camera should be positioned; that is your camera angle. Use close-up when the face matters, waist-up when you want a balance of face, clothing and pose, full-body when the complete outfit, vehicle or body position matters, and wide framing when the environment is part of the story. Then choose an angle that supports the mood. Prompt King can help you discover photo prompt ideas, and once you understand framing and camera angles, you can customize those prompts much more effectively.
Frequently Asked Questions
What is the difference between framing and camera angle?
Framing describes how much of the subject appears in the image, while camera angle describes where the camera is positioned in relation to the subject.
Which framing is best for showing the face clearly?
Close-up, head-and-shoulders and waist-up framing usually show more facial detail than full-body or wide environmental shots.
Which framing should I use for bike or car photos?
Full-body or wider framing is usually more useful because it gives enough space to show both the person and the vehicle clearly.
Does a low-angle shot always make the image look better?
No. A low angle can create a stronger or more dramatic feel, but an extreme angle may distort proportions. A slight low angle is often easier to control.
Can Prompt King choose the camera angle for me?
Prompt King helps you discover and copy photo prompts. You can edit the framing and camera-angle instructions before using the prompt in a compatible AI tool.
Put an idea into words.
Find a prompt, change a detail, and explore a new direction.
Explore prompts →